Develop your own (trips) map with Mapbox (Beginner level)
MapBlogDevelopmentTripMapbox
5 years ago
What am I going to talk about?
On the article which presents the best tools to integrate a map on your blog, I was telling you about 4 different solutions to integrate a map on a website or on a blog. Among those solutions, you can find Mapbox, a well-known technology which will help you to display a map on your website, exactly as Google Maps services does.
We're going to see that map integration, is the most complicated solution, but also the cheapest one if you do it on your own. This is the way you'll reach the result you expect, that is branded for your website, but only if you have enough time to spend on it.
If you have neither the time nor the skills to develop such a map, using Mapbox or Google Maps, I really advise you to find alternative solutions on this blog post, but you need to know that, to my mind, the one that will allow you to get the closest result to a custom integration, and the fastest, is TraveledMap.
The note above isn't just pure luck: When I developed TraveledMap, I designed it in order to simplify usage of technologies like Mapbox or Google Maps, thinking about people who don't have time or don't have skills to use them. Please note that I mainly used Mapbox with React, a web framework making it faster to develop, more reactive and less buggy, but it's more likely that your use case is pure Javascript ("Vanilla"). This is why I'll explain how to integrate a map with Mapbox without any framework and I'll pay attention to explain how to do it with WordPress.
Summary
Create a map
To be able to start with Mapbox, you need to create an account, otherwise you won't be able to show a map. You can do it on this page. Once your account created and activated, you'll have access to your Dashboard, which contains a particular, very interesting piece of data: Your access token (it should begin with pk.)
This access token is a key, which is necessary to be able to identify you when you'll want to show a map. You need to be identified for two main reasons:
It allows to link the map to your account, taking into account any change you did on maps of your Mapbox account. You can create custom styles for instance, thanks to the studio, and those styles wouldn't be found if you would use someone else's access token.
It also allows to count the number of map loads (or map displays) you asked for, which is necessary to have account and payment statistics.
Mapbox offers 50 000 map loads per month, which is enough in a lot of cases. However, if you're developing a website that should quickly have more than 50K views (on the page where the map is loaded), you will have to pay $5 per 1000 views (beyond the 50K free views). You also need to know that there are alternatives to Mapbox, with lower fees, but it doesn't exclude developing the map with Mapbox tools (you can use Mapbox open source tools but use other map displaying apis).
Let's do this, let's show our first map ! I will explain how to do this in different steps, but don't worry, you'll find the final code at the end of this blog post.
To start with, open the file containing the HTML code of your page, or, on WordPress, edit the page that should show the map, by adding a new Custom HTML bloc, and add this content:
<scriptsrc="https://api.mapbox.com/mapbox-gl-js/v2.0.1/mapbox-gl.js"></script><linkhref="https://api.mapbox.com/mapbox-gl-js/v2.0.1/mapbox-gl.css"rel="stylesheet"/><divid="map"style="height: 500px;width: 100%"></div><script>
mapboxgl.accessToken ='Dont forget to replace this by your access token';var map =newmapboxgl.Map({container:'map',// map container identifierstyle:'mapbox://styles/mapbox/light-v10',// map style URL to usecenter:[2,45],// default center of the map [lng, lat]zoom:2// default zoom});</script>
Save, show the draft of your page and ... Eureka! 🎉 Now you should see the map displayed.
Your first map on a website or WordPress blog with Mapbox
Let's split the code before in different pieces:
The two first lines are used to load the necessary resources to make the map work as expected:
Finally, the script with let us to execute the code that allows us to load the map and show it:
<script>
mapboxgl.accessToken ='Dont forget to replace this by your access token';var map =newmapboxgl.Map({container:'map',// map container identifierstyle:'mapbox://styles/mapbox/light-v10',// map style URL to usecenter:[2,45],// default center of the map [lng, lat]zoom:2// default zoom});</script>
Don't forget to add your access token to this piece of code, otherwise, the map won't load. Each parameter passed to the mapboxgl.Map initialization can be changed:
container: It should be the same as the id of the container's element (see above)
style: it's the map style. You can customize them or create new ones on the Mapbox Studio. Mapbox has 4 or 5 presets to help you get started quickly. You can visualize them here.
center: this is the map's default center. The first figure (2) corresponds to the longitude, and the second one (45) corresponds to the latitude.
zoom: this is the default zoom, it should be a number between 0, which is the largest scale, the more dezoomed, and 20, which is the smallest scale, the more zoomed. With a zoom level equals to 20, you'll see the streets and homes. The best zoom level for a use case like showing worldwide trips is between 1 and 3.
Add markers
Now that the map is showing on the page with the zoom, center and style you chose, let's see how to add your trips on it (for instance). In this step, we'll create a list of destinations and show them on the map thanks to markers.
Mapbox created a lot of explained examples to integrate maps, find them on this page.
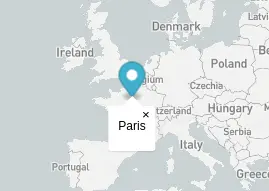
The first step is to create a single marker, so that we can understand how it works. Adding a marker on the map isn't complicated, you just need to keep the code we wrote to show the map and add this line (just before closing the <script/> tag):
This line will add a pin (a marker) near Paris, at the following coordinates: 2.35, 48.85
Displaying a marker near Paris
During the second step we're going to create a list of trips and show a marker for each of them. When using JavaScript (the language used in the previous lines), you can create lists of objects. In our use case, an object will represent a trip and will be represented by braces {}, and the list by brackets [] Here's an example with three trips:
var trips =[{coordinates:[2.35,48.85],},{coordinates:[-74,40.71],},{coordinates:[-7.99,31.62],}]
Now that we have a list, we have to iterate through the trips to show them (iterating is like doing an operation for each of them). You can remove the previous piece of code (new Mapboxgl.Marker) and replace it with:
There should be 3 markers on the map now ! In order add your trips instead, you just have to replace those 3 objects by yours and add as many other objects as you want between the brackets.
Add trips' name
I think you may want to show the trip name under the marker. If it's the case, we can do it easily thanks to a Mapbox popup. Popups are really easy to use, we just have to add two lines to the previous code, showing the markers:
trips.forEach(trip=>{newmapboxgl.Marker().setLngLat(trip.coordinates).setPopup(newmapboxgl.Popup({anchor:'top'})// adds a popup.setHTML('<p>Trip to Marrakech</p>')).addTo(map);});
You should now be able to see the name "Marrakech" in a small white box under the marker, when clicking on it. You probably noticed that whatever marker you click on, only Marrakech is written. To fix this, we're going to add a new proporty "name" to our trip objects:
var trips =[{coordinates:[2.35,48.85],name:'Paris'},{coordinates:[-74,40.71],name:'New York'},{coordinates:[-7.99,31.62],name:'Marrakech'}]
and we're going to use it dynamically while iterating, just by replacing.setHTML('<p>Trip to Marrakech</p>')) by.setHTML('<p>' + trip.name + '</p>'))
Popup with Paris displayed in it
Customize markers
Finally, we're going customize the markers by using an image that corresponds to your site branding. Only a few style lines are required to use the picture. Let's add a style tag just before the <divid="map">:
It's also required that you create the marker on a custom element, that you'll add, by replacing the markers creation lines by those ones (please note that an offset of 15px is added because 15 is half of the marker's style height, defined above):
trips.forEach(trip=>{var el = document.createElement('div');
el.className ='marker';newmapboxgl.Marker(el).setLngLat(trip.coordinates).setPopup(newmapboxgl.Popup({anchor:'top',offset:15}).setHTML('<span>'+ trip.name +'</span>')).addTo(map);});
TL;DR
Here is the final result along with the final code If you encounter any problem, if you have comments or if you need a developer to integrate a map on your website, don't hesitate to contact me at contact@traveledmap.com
Final result
<!DOCTYPEhtml><html><head><metacharset="utf-8"/><title>My first map with Mapbox</title><metaname="viewport"content="initial-scale=1,maximum-scale=1,user-scalable=no"/><scriptsrc="https://api.mapbox.com/mapbox-gl-js/v2.0.1/mapbox-gl.js"></script><linkhref="https://api.mapbox.com/mapbox-gl-js/v2.0.1/mapbox-gl.css"rel="stylesheet"/><style>.marker{background-image:url('https://www.traveledmap.com/images/home/marker-traveled.png');background-size: cover;width: 30px;height: 30px;border-radius: 50%;cursor: pointer;}</style><divid="map"style="height: 500px;width: 100%"></div><script>
mapboxgl.accessToken ='Dont forget to replace this by your access token';var map =newmapboxgl.Map({container:'map',style:'mapbox://styles/mapbox/light-v10',center:[2,45],zoom:2});var trips =[{coordinates:[2.35,48.85],name:'Paris'},{coordinates:[-74,40.71],name:'New York'},{coordinates:[-7.99,31.62],name:'Marrakech'}];
trips.forEach(trip=>{var el = document.createElement('div');
el.className ='marker';newmapboxgl.Marker(el).setLngLat(trip.coordinates).setPopup(newmapboxgl.Popup({anchor:'top',offset:15}).setHTML('<span>'+ trip.name +'</span>')).addTo(map);});</script></body></html>